Have you ever watched someone with perfectly lined eyes and wondered how they achieved such flawless definition? Applying eyeliner can be intimidating, especially for beginners who are just starting their makeup journey.
The good news is that learning how to apply eyeliner for beginners doesn’t have to be complicated. With patience, practice, and the right techniques, you can master this essential makeup skill and elevate your everyday look or create dramatic effects for special occasions.
This article will walk you through everything you need to know about applying eyeliner, from choosing the right type for your needs to mastering different techniques that will complement your eye shape.
Understanding Different Types of Eyeliner
It’s important to understand the various types of eyeliner available and their unique benefits:
Pencil Eyeliner
- Easiest to use for beginners
- Creates soft, smudgeable lines
- Perfect for everyday looks
- Less precise than other types
- Great for tightlining (lining the waterline)
Gel Eyeliner
- Comes in a pot and applied with a brush
- Offers precision with practice
- More long-lasting than pencil
- Water-resistant properties
- Versatile for different line thicknesses
Liquid Eyeliner
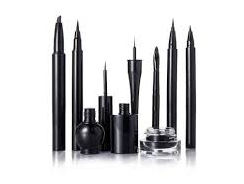
- Comes in pen or brush form
- Creates the most defined, precise lines
- Perfect for creating wings or cat eyes
- Requires the steadiest hand
- Longest-lasting formula
Cream Eyeliner
- Similar to gel but with a creamier consistency
- Applied with a brush
- Good middle ground between gel and pencil
- Can be built up for intensity
Essential Tools for Applying Eyeliner
Having the right tools can make the difference between frustration and success when learning how to apply eyeliner for beginners:
For All Eyeliner Types
- Small magnifying mirror
- Good lighting
- The cotton swabs and makeup remover for corrections
- Eye primer to help eyeliner last longer
For Gel and Cream Eyeliners
- Angled eyeliner brush
- Fine-tipped detail brush for precision
For Setting and Smudging
- Small smudging brush
- Black or brown eyeshadow for setting pencil liner
Preparing Your Eyes for Eyeliner Application
Before applying any eyeliner, proper preparation will ensure a smoother application and longer-lasting results:
Cleanse and Moisturize
- Start with clean, dry eyelids
- Apply a light eye cream, avoiding the lash line
Prime Your Eyelids
- Apply eyeshadow primer to prevent smudging and creasing
- Set with a neutral shadow or translucent powder
Apply Eyeshadow First
- If using eyeshadow, apply before eyeliner
- This creates a base that helps eyeliner glide on smoothly
Stabilize Your Hand
- Put your elbow down on a level surface.
- Use your pinky finger against your cheek for stability
Step-by-Step Guide to Applying Pencil Eyeliner
For beginners, pencil eyeliner is the most forgiving option:
 Choose the Right Pencil
- Opt for a soft, creamy formula that glides easily
- Black, brown, or gray are versatile starting color
Warm Up the Pencil
- Roll the tip between your fingers to soften it
- This helps create smoother lines without tugging
Position Yourself Correctly
- Look straight into a mirror, then slightly tilt your chin up
- Keep your eye slightly open while applying
Start with Short Strokes
- Begin at the middle of your upper lash line
- Make small, connected dashes rather than trying to draw one continuous line
- Start at the corner of your eye and work your way out.
- Then go back to the middle and work inward
Connect the Dots
- Go back and fill in any gaps between your dashes
- Keep the line as close to your lash line as possible
Smudge for a Softer Look
- Use a smudging brush or cotton swab to soften harsh lines
- Do this quickly before the liner sets
Mastering Liquid Eyeliner for Beginners
Once you’re comfortable with pencil eyeliner, you might want to try liquid:
Select a Beginner-Friendly Format
- Pen-style liquid liners offer more control than brush tips
- Look for ones with a firm rather than flexible tip
Create a Guideline
- Use pencil eyeliner or eyeshadow to create a light guideline
- This gives you a roadmap to follow with your liquid liner

The Dotting Method
- Draw tiny dots along the length of your lashes.
- Connect the dots with short strokes
- This is more manageable than trying to create one smooth line
The Resting Method
- Rest the liner flat against your lash line
- Slowly drag it across while keeping contact with your skin
Practice Wings Separately
- Master lining your lash line before attempting wings
- When ready, start with a small wing and build up gradually
Applying Gel Eyeliner with Precision
Gel eyeliner combines the precision of liquid with the forgiveness of pencil:
Prep Your Brush
- Use an angled brush for the best control
- Before applying, remove any surplus product from the brush.
Dip and Apply
- Collect a small amount of product on your brush
- Apply using the thin edge of the angled brush
Build Gradually
- Start with a thin line and build thickness as desired
- You have greater control over the Outcome this way
Clean Up Your Brush
- Wipe your brush between applications for crisp lines
- Consider having two brushes – one for precise lines and one for smudging
Eyeliner Techniques for Different Eye Shapes
How to apply eyeliner for beginners should include understanding what techniques work best for your specific eye shape:
For Almond Eyes
- Almost any eyeliner style works well
- Focus on thickening the line slightly at the outer corner
For Round Eyes
- Start your line from the middle of the eye rather than the inner corner
- Create a thicker line at the outer corner to elongate the eye

For Hooded Eyes
- Keep the line very thin along the lash line
- Make sure the wing is visible when your eyes are open
- Consider ‘batwing liner’ technique (creating a higher wing)
For Downturned Eyes
- Make a flick upward in the outer corner.
- Don’t extend liner too far down at the outer corner
For Monolid Eyes
- Create a slightly thicker line that will be visible when eyes are open
- Consider a subtle wing that follows your natural eye shape
Creating a Basic Winged Eyeliner
The classic winged eyeliner is a staple technique worth mastering:
Map Out Your Wing
- Visualize an extension of your lower lash line
- Leave a dot at the spot that the wing should end
Create the Wing First
- Draw a small diagonal line from the outer corner toward the end of your eyebrow
- The length and angle determine how dramatic your wing will be
Connect to Your Lash Line
- Draw a line from the tip of your wing to your lash line
- Fill in the triangle created
Complete the Lash Line
- Finish lining your upper lash line, connecting to the wing
- Adjust thickness as desired
Tightlining: The Invisible Eyeliner Technique
Tightlining creates the illusion of fuller lashes without obvious eyeliner:
Choose the Right Product
- Use a waterproof pencil liner in black or dark brown
- Ensure it’s eye-safe for waterline use
Position Your Pencil Correctly
- Gently lift your upper lid to expose the waterline (the rim beneath your lashes)
- Place your pencil directly under your lashes
Apply with Gentle Strokes
- Use short, gentle strokes to deposit color
- Focus on filling gaps between lashes rather than creating a line
Consider Lower Waterline
- For more definition, you can also line your lower waterline
- Use a lighter color (like nude or white) to brighten eyes
Troubleshooting Common Eyeliner Problems
Here are solutions to common issues beginners encounter when learning how to apply eyeliner:
Smudging and Transferring
- Set pencil liner with matching eyeshadow
- Use waterproof formulas
- Apply setting powder under your eyes
- Consider an eye primer specifically designed for oily lids
Uneven Lines
- Use the dotting technique
- Start by practicing on the back of your hand.
- Consider using tape as a guide
Shaky Hands
- Rest your elbow on a table
- Use your pinky finger as an anchor against your cheek
- Try sitting down instead of standing
- Take a deep breath before applying
Watery Eyes
- Allow your eyes to rest between steps
- Use hypoallergenic formulas
- Apply in a well-ventilated area
Making Your Eyeliner Last All Day
To ensure your hard work stays in place:
Layer Your Products
- Apply pencil liner, then set with powder
- Or use pencil as a base for liquid liner
Use Setting Spray
- A light mist of setting spray helps lock in your look
- Hold the spray at least 8 inches from your face
Avoid Touching Your Eyes
- Be conscious about rubbing or touching your eye area
- Carry cotton swabs for touch-ups rather than using fingers
Remove Properly
- Use a dedicated eye makeup remover
- Be gentle – no harsh rubbing that can damage delicate skin
FAQs
How can I stop my hand from shaking when applying eyeliner?
Stabilizing your hand is crucial for smooth eyeliner application. Rest your elbow on a flat surface like a table or desk. Use your pinky finger as an anchor by resting it against your cheek while applying.
Try sitting down instead of standing, and take slow, deep breaths to steady yourself. Some find it helpful to apply eyeliner in sections rather than trying to create one continuous line.
What type of eyeliner is best for complete beginners?
Pencil eyeliner is universally recommended for beginners due to its forgiving nature. It’s easier to control, can be smudged to hide mistakes, and doesn’t require the steady hand that liquid eyeliner demands.
Look for a soft, creamy pencil that glides on without tugging at your delicate eyelid skin. Retractable pencils eliminate the need for sharpening and often provide a more consistent application.
How do I prevent eyeliner from smudging on hooded eyes?
Hooded eyes present unique challenges for eyeliner application. To prevent smudging, start with an eyeshadow primer specifically designed for oily lids.
Apply a thin layer of translucent powder before your eyeliner to absorb excess oil. Choose waterproof, long-wearing formulas and set pencil liner with a matching powder eyeshadow.
Keep the line thin, especially where your hood touches your mobile lid. Finally, allow your eyeliner to fully dry before blinking or looking upward.
What’s the difference between tightlining and waterline application?
Though often confused, tightlining and waterline application are slightly different techniques. Tightlining refers specifically to applying eyeliner to the upper waterline – the rim directly beneath your upper lashes.
This creates the illusion of thicker lashes and definition without a visible line above the lashes. Waterline application can refer to lining either the upper or lower waterline (the moist rim of tissue between your eyes and lashes).
How can I fix eyeliner mistakes without removing all my makeup?
Eyeliner mistakes don’t have to ruin your entire makeup look. For quick fixes, dip a cotton swab in micellar water or makeup remover and precisely target just the mistake. Angled cotton swabs offer even more precision. Alternatively, use a small concealer brush with a tiny amount of concealer to clean up edges or uneven lines.
For smudges under the eye, wait until they’re dry, then gently roll a cotton swab over them to remove without disturbing foundation. Keep makeup-removing pens in your bag for on-the-go corrections that won’t disrupt the rest of your carefully applied makeup.
Conclusion…
Learning how to apply eyeliner for beginners takes time and practice, but with these techniques and tips, you’ll be creating beautiful eye looks before you know it. Remember that everyone’s eye shape is different, so what works for someone else might need adjustment for your unique features.
The beauty of eyeliner is its versatility – you can create countless looks from subtle definition to dramatic statements once you master the basics. With regular practice and the guidance provided in this article, you’ll soon be lining your eyes like a pro and enjoying the transformative power of this essential makeup skill.

